Bottle
rockets are excellent devices for investigating Newtons Three Laws of Motion.The rocket will remain on the launch pad
until an unbalanced force is exerted propelling the rocket upward (First
Law).The amount of force depends upon
how much air you pumped inside the rocket (Second Law).You can increase the force further by adding
a small amount of water to the rocket.This increases the mass the rocket expels by air pressure.Finally the action force of the air (and
water) as it rushes out of the nozzle creates an equal and opposite reaction
force propelling the rocket upward (Third Law).
In this assignment, you will make a .5 liter bottle rocket, that is propelled by water and high pressure CO2.
You can use any design that you would like, but a couple of success design
types will be highlighted in this assignment.
Objective:
Design
and make a rocket that will achieve maximum altitude when released from a
rocket launcher.
Possible
Materials and Tools:
·.5 Liter / 20 oz / 16 ozsoda pop bottle (Dr. Pepper is best)
As much as possible,
pressurize your .5 L pop bottle. The best way to do this is with a pop
bottle pump, or you can simply blow into the bottle and try to make it as
hard as possible.Place the
plastic bottle top on the bottle, losing as little pressure as possible.
Cut out the paper
measuring tape printed on the sheet with the transition cone and measuring
tape. You need this to decide where to place your fins. Are you going to
use 2, 3, or 4 fins?There are 360
degrees around your bottle. You fins need to be placed evenly apart. You
will use the measuring tape and a marker to mark where you will be putting
your fins.(1800, 1200,
or 900). The fins should also go 6.0 cm from the opening
(flange) of the bottle.
The placement and
usage of fins is critical to the success of your rocket. It is critical
that the fins be placed straight on the bottle, and they be evenly spaced
on the rocket. To make straight vertical lines for the fin placement,
hold the bottle up against a door frame. Use a permanent marker to draw
the placement markings. Make these lines 5.0 cm long.
Lightly sand inside of each of the bottle feet
where the air tube (paper towel roll) will fit. The sanding is done in
preparation for the attachment of the air tube. You will also sand the
areas where the fins will be attacked.
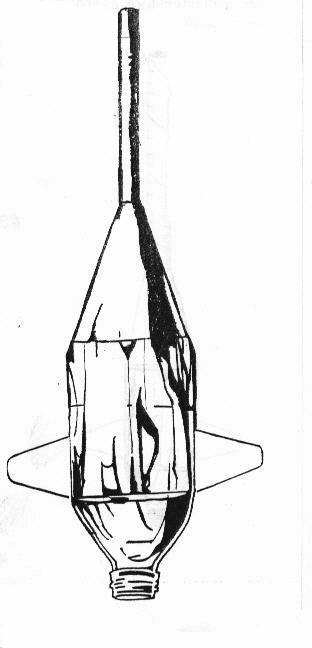
THE AIR TUBE
The stratoblaster box is a holding fixture and
alignment tube. The essential thing here is that the AIR TUBE MUST GO ON STRAIGHT. You can make your own holding
box from a shoe box, or come up with another method, but the tube has to
be straight.
Using a glue gun, run a small bead of glue on
one end of the air tube. Stick the air tube to the sanded bottom of the
plastic bottle, in the holding fixture. Make sure that the holding
fixture is properly aligned. Let the glue set for a few minutes.
After the glue has set, remove the assembly
from the holding fixture. Run a bead of the glue around the base of the
tube, where it meets the plastic bottle. This will secure the air tube to
the body of the bottle rocket. Check the rocket again in the holding
fixture, to assure that the air tube and body stay aligned and straight.
THE FINS
If possible, repressurize your bottle rocket.
The tighter the surface body, the easier it will be to attach your fins
correctly.
How are you going to design your fins? Will
you use balsa wood, cardboard, or some other material? The fins must be
firm, hard, but not TOO heavy. Styrofoam may work, as some types of
plastics ( remember you have to cut these? What
shape do you want to make your fins?
Sand both sides and the bottom of the fins.
These fin edges need to be smooth where the glue will be applied. Use a
glue gun to run a thin bead of glue along the base of one of the fins.
Press the fin into place along the mark on the rocket body. Make sure the
fin is perfectly aligned along the mark. Let the glue set for a minute.
Then run a bead of glue along the other side of the fin. Repeat this
process for as many fins as you are using.
Transition Cone
Cut out the transition cone from the printed
sheet with the cone template on it. Crease the transition cone along the
dotted line. What are you going to use for your cone material?It needs to be something lightweight,
flexible, and somewhat sturdy? Cardboard will not make a cone very well,
maybe something like construction paper, maybe something like thin foam rubber,
or manila folder paper.
Use the transition cone template to make a
transition cone out of the material that you want to use. Roll the
transition cone across the edge of a table.
Roll the transition cone semi-tightly in your
hand. Then carefully unroll it and align the dotted line to the opposite
edge. The small opening will be 2.5 cm in diameter. Tape the cone along
the seam using transparent tape.
Slide the transition cone over the air tube
that is connected to the body of the rocket. IT should fit snugly. If it
does not fit snugly, spot glue the cone to the air tube using a glue gun.
Smooth the glue as much as possible. Allow the glue to cool before
finishing the rocket.
The NOSE CONE
A ping pong ball works extremely well as the
nose cone for your rocket. You are welcome to try and experiment with
other tops for your rocket if you wish.The ping pong ball is an outstanding performer in this rocket
style. Using your glue gun, glue one end of a piece of string or fishing
line to the ping pong ball. Your string needs to be no longer than 10.0
cm.
Take the other end of the string and thread it
through a hole in the back of a old thread
spool. Knot it or glue it to the back end of the spool so that the ping
pong ball nose cone will stay in the spool.
Place the spool into the air tube with the ping
pong ball sitting on top.
Decorate Your Rocket using paint, stickers, and
glitter, whatever!!!